Sleeper Storage Device Build - Microscience Stealth
Author: Dennis GarciaIntroduction
Growing up I had a unique fascination with computers. My interest went beyond games or programming and, while I did my fair share of both I often found myself reading computer magazines looking to see what new computers were coming out and what features they would include. I suspect this desire and curiosity carried over to my adult life and was a major reason why I started doing computer hardware review.
When I first started Ninjalane.com back in 1999 the website was dedicated to computer modifications. These mods were typical for the time showing how to improve case cooling, custom paint projects and even hardware modifications. These early adventures started in the era of the Pentium II, Socket 370 and Athlon XP and by then computers were on a 9-month upgrade cadence with new and exciting technology being released every day.
I still remember being upset when I could no longer buy a chassis with a segmented LED display and had to be careful about “what” chassis you bought since both AT and ATX cases where being sold side by side.
So, why bring all of this up??
One of the technologies that fascinated me was early hard drives. The family Tandy 1000SX came with dual floppy drives and I had spent money to add more system memory and even bought a 2400 baud modem so I could surf the local BBS sites. The dual drive configuration required a lot of disk swaps with all of my software being stored on a stack of 360k 5.25” Floppy disks.
However, when I visited my friends, I discovered that their computers were a little different. Instead of two floppy drives they had a single floppy and another drive with a sleek faceplate and a little blinking light in the corner. This was my first memory of a hard drive and the possibilities changed everything.
By the time I built my first computer the era of the IDE drive had taken over. My build was a 386 16Mhz that I bought used from the local repair shop along with a 540MB IDE drive and a small stack of expansion cards and Mini Tower chassis. The IDE drive was the standard 3.5” internal drive and the blinking light had been moved to the case bezel.
The era of the MFM/RLL Winchester hard drive was over and was the one technology I had never experienced for myself.
Until now.
When I started on this Retro PC adventure, I had a number of goals in mind with the first being a deep dive into old hard drive technology. This brought with it a number of challenges including availability which turned out to be one of the most difficult to overcome. You see, Winchester hard drives were expensive when they were new and had a very short life span of about 5 years. Limited storage capacity meant that computer users would be driven to upgrade their storage solutions quickly and prompting older drives to be traded in or trashed at the drop of a hat.
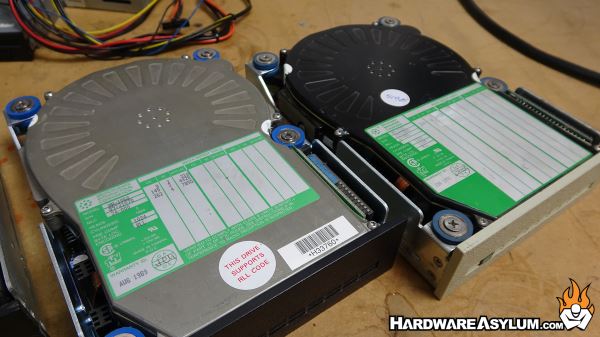
Keep in mind that this was the late 80’s and of the surviving drives a good majority of them have stopped working and if you are lucky enough to find a good drive it can be worth a small fortune to the right people. Because of this, I started to be extremely selective in my drive choice and eventually settled on the Microscience brand. Microscience was a Tawineese maker of high-quality and high-performance hard drives. Sadly they ran into issues making the transition from Winchester to IDE and eventually closed up shop. Their drives are some of the most decorative in existence and rarely suffer from catastrophic failure so, the hunt was on.
eBay can be a wealth of opportunity when it comes to finding computer parts. The local electronics recycler could care less about 40+ year old technology and while gems can be found in the discarded junk they are often gobbled up by the employees are donated to private collections.
In searching eBay I found a store selling a number of Microscience hard drives and with a little wheeling and dealing I became the proud owner of ten drives of unknown status or condition. As luck would have it I was able to get half of the drives back to a fully working status, two drives died due to electrical failure, one had mechanical failure and one drive was DOA.
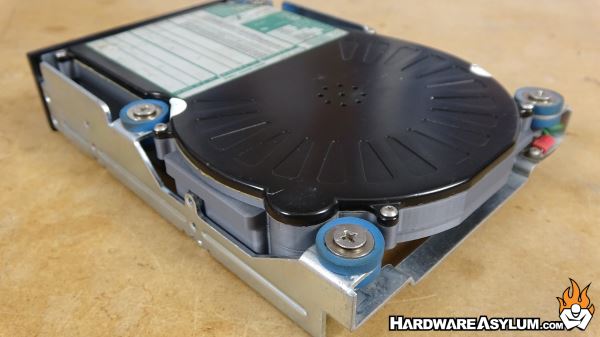
This DOA drive was a mystery to me but gave me an excellent idea to recycle the parts into a new hard drive that looked exactly like a Microscience HH-1120 but with upgraded solid state internals making it the ultimate storage solution for your Retro or Sleeper PC when every detail counts.
Building my Sleeper Storage Device (SSD) is rather straight forward. The first part was to harvest the required components from my dead drive. This included the metal frame that held the drive and allowed it to be installed into your PC. The next was the faceplate followed by the lid.
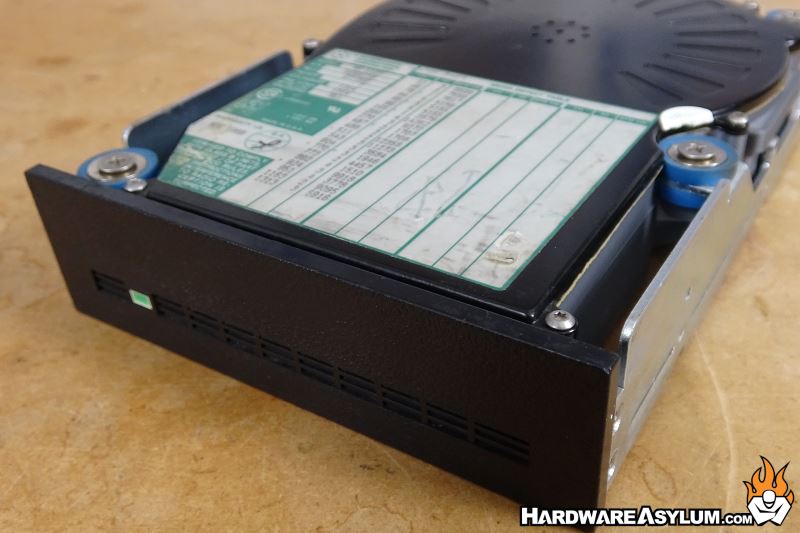
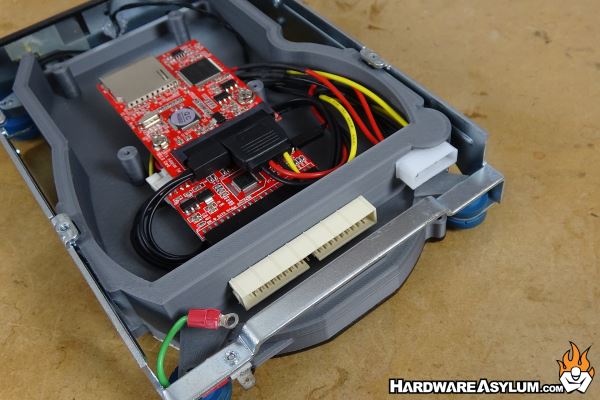
I then modeled two components that would serve as the connection between the frame and drive lid while leaving enough room inside to hold an IDE to SATA adapter and choice between a SATA to SD adapter or standard 2.5” SATA SSD.
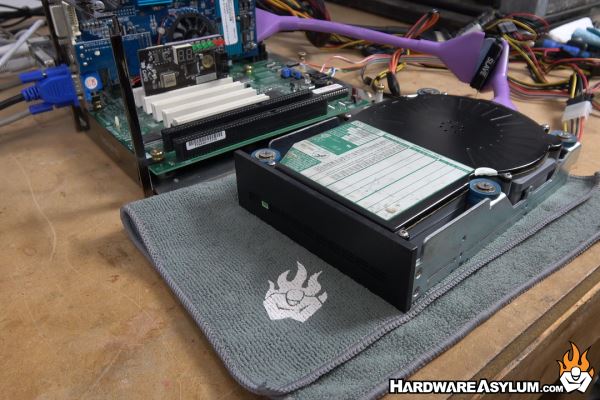
The intent is to mirror the actual drive so that the casual observer would have no idea that this new drive was anything but an old Microscience RLL Winchester hard drive.
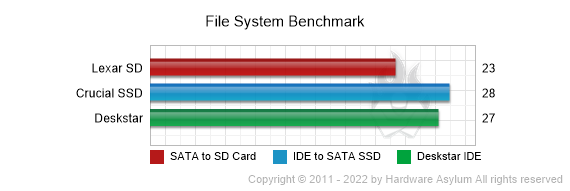
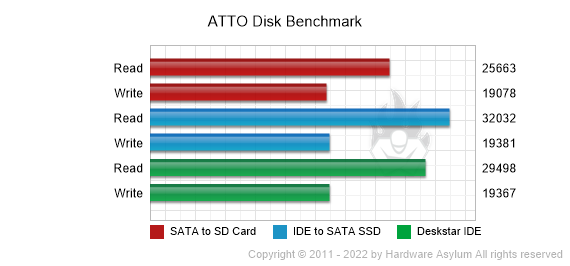
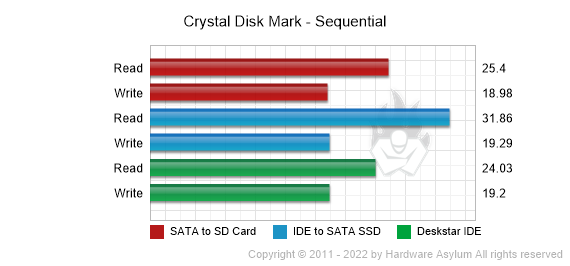
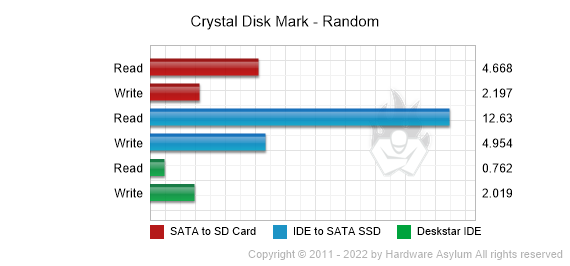
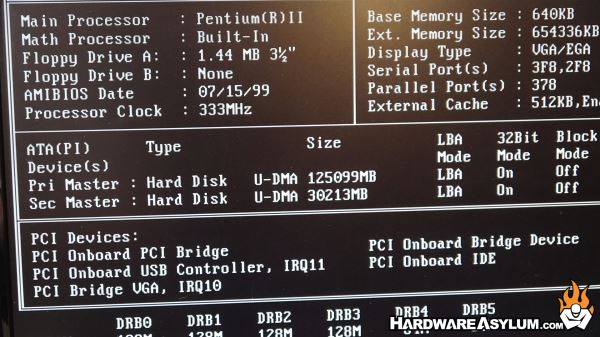
Once the drive was assembled I did some high level testing to check the performance and identify any major limitations.
Pentium II 333Mhz Slot 1
Tyan Tsunami Slot 1 Motherboard – 440BX Chipset
640Megs SDRAM Memory
Hercules 3D Prophet II Ultra – Geforce 2 Ultra
Windows 2000 Service Pack 4
Sleeper Storage Device
SATA to SD Adapter w/ Lexar 64GB 1667x
IDE to SATA Adapter w/ Micron 128GB SSD
IBM Deskstar 250GB 7200RPM
While I have no respect for the Sleeper PC I fully understand why people build them. I lived through that era and the modifications I did to those computers is the same thing the Sleeper PC builders are doing to these old cases now. Unfortunately, the destroying of old computer cases doesn’t gain you much, the mods I did to old computer cases rarely supported the vintage platforms we installed back then and is actually makes thing worse on a modern platform.
Despite this, many sleeper builds are pure works for art and reflect strongly on the people who do then correctly, even if the system can never be used to its full potential.
My Sleeper Storage Device rides the wave between these. For those looking to add a modern storage solution to their Retro PC build but want to make sure everything is visually period correct then my project is a perfect solution.
On the opposite side, for those building a Sleeper PC there is a strong chance that vintage storage is not on their list of requirements and should be, if anything to properly sell the build for what it is.
My project is geared more towards the Retro PC side of things given the IDE interface limitation. There is also a limitation of what solid state storage you plan to use. I found that my SATA to SD card adapter has a hard size limit of 30GB which can limit overall storage capacity. However on a Socket 5 or Socket 7 or older system you’ll find that 30GB is more than enough and will likely be limited even further by motherboard BIOS limitations.
If you ditch the SATA to SD adapter for a standard SSD the hardware limitation is removed and will be dependent on motherboard support and ATA interface speed.
As my benchmarks showed, SD cards are quite fast but suffer from random write performance while SSDs offer better overall performance at the expense of additional cost. Of course, both are faster than the standard IDE drive making either option a win, win.