How I prepared for the MOA 2012 Americas Qualifier
Author: Dennis Garcia
Published: Sunday, May 20, 2012
The Overclocking Process
There are two different approaches when it comes to the overclocking process. Some folks take a methodical approach starting at stock speeds and explore what their hardware can do and slowly progress to their intended goal. This works well for 24/7 overlocking adventures but can take a long time to complete when you are using LN2. Other folks tend to research and ask questions long before they start freezing chips with the intent that they can just type in values and voltages and leap around trying different things.
I do a little bit of both. Since I don't extreme overclock on a daily basis I tend to read and research a lot looking at what other people have done and determine where to go from there. Thing is there are times when you just have to jump in and go with your gut.
I do a little bit of both. Since I don't extreme overclock on a daily basis I tend to read and research a lot looking at what other people have done and determine where to go from there. Thing is there are times when you just have to jump in and go with your gut.
Processor Overclocking
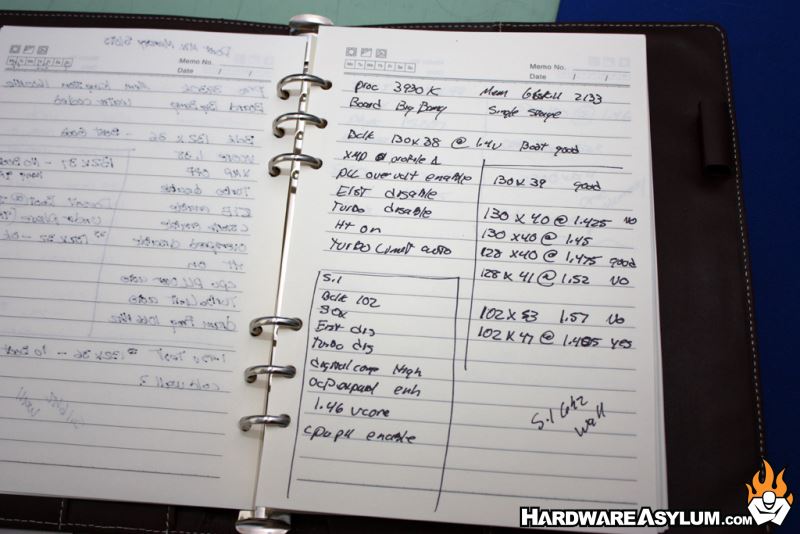
For the processor I was already familiar with the overclocking process on the LGA2011 and was able to just type in voltage and frequency settings. Before too long I was running at 5Ghz+.
Here was the breakdown of my processors.
Here was the breakdown of my processors.
- Core i7 3960X, this is my main processor and it would run 5.2Ghz on the phase with 1.425v and was 100% stable. Sadly that speed isn't worth any points on HWBot and was all the faster it would run. (never ran this proc under LN2)
- Core i7 3930K #1, this processor would run 5.15Ghz at 1.48v and wasn't that stable on the phase at that speed but would complete benchmarks under LN2. It really liked running cold (-60c) but would CBB at -36c.
- Core i7 3930k #2, this was a great processor and would run 5.3Ghz at 1.515v but wasn't stable at that speed under the phase. Phase speed was 5.1Ghz at 1.425v. Sadly the processor didn't like running cold and would cold bug at -50c but ran great at -36c
Overclocking a video card is somewhat difficult. The overall process is pretty simple you just launch any one of the available overclocking tools to adjust the video card settings. When running MSI hardware with MSI Afterburner you have the added benefit of voltage adjustments.
The difficulty comes when testing your clocks, if the clock settings are good everything tends to go well. When you are slightly out of band sometimes the benchmark will crash and dump you back to the desktop. However, when you really push things the driver will often crash requiring you to reboot. This is the most painful part as it wastes so much time.
Typically when overclocking a video card I start with stock clocks and find the limit of my memory. I then back the memory clock down and start increasing the GPU clock until I find the limits. During this process I am simply making sure the benchmark doesn't crash before increasing the clock again. (limits testing not stability)
What I found out was that this approach was wrong and will often yield final results that are less efficient than they could be. The results will also hide what is actually making your overclock slower than it should be. For instance my HD7970 Lightning will run with a 1900Mhz memory clock but the benchmark scores were lower than if I ran the memory at 1800Mhz. It wasn't until I started actually "binning" the card and testing the different combinations that I discovered the problem and was able to resolve it.
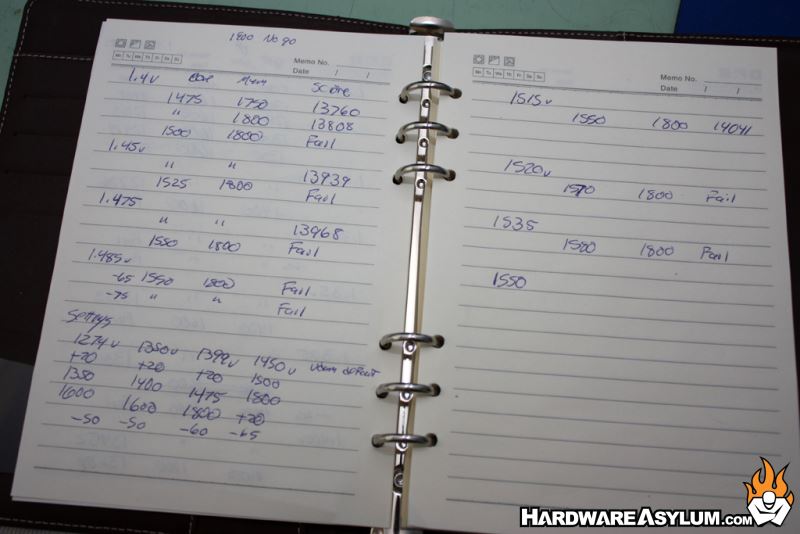
Having figured this out I set out to find the apex in my performance curve and thus determine what core speed matched to the memory clock to render the best results. I also determined what temperature was needed to run at a certain speed and match that with a core voltage for stability.
The end result were my best 3DMark 11 and 3DMark 03 scores ever (to date). Had I not re-evaluated my card clocks I may never have known.
The end result were my best 3DMark 11 and 3DMark 03 scores ever (to date). Had I not re-evaluated my card clocks I may never have known.