NVidia GTX 660Ti SLI Performance and Overclocking
Author: Dennis Garcia
Published: Tuesday, August 21, 2012
How to Setup SLI
To begin any SLI adventure you need a few simple things.
- An SLI capable motherboard. You can consult the Ninjalane Multi GPU index for motherboard compatibility and optimal video card configurations.
- SLI capable video cards. The actual number of cards will depend on the GPU and for this you can consult the video card documentation or simply look at the card and count how many bridge connections are present. If there is only one connection then this is a 2-way only GPU. If there are two bridge connections then the GPU can support three or more GPUs depending on the drivers.
- SLI bridges. The bridges are small connectors that link the cards together using the bridge along the top of the video card. Any motherboard supporting SLI should have these included.
- SLI approved power supply. These can be tricky to locate but look for a SLI logo on your PSU and make sure there are enough PCI Express leads to power all of your video cards. In terms of wattage start with the base recommendation and add the TDP wattage for each card to that. E.g. GTX 660Ti recommends 500w, adding a second video card will add 170w leaving you with a 700w PSU recommendation.
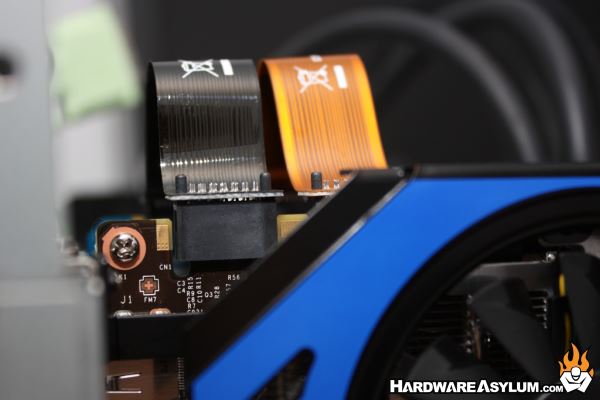
The decision to arrange them this way was partially due to the MSI heatsink. If you look at the photo you'll see that the heatsink blocks direct access to the bridge connection. This alone will limit you to using the ribbon bridges to connect the cards.
You don't need to populate both of the bridge connections for 2-way SLI but if you have extras then why not use'em.
The final step is to open up the driver control panel and enable SLI.
You don't need to populate both of the bridge connections for 2-way SLI but if you have extras then why not use'em.
The final step is to open up the driver control panel and enable SLI.
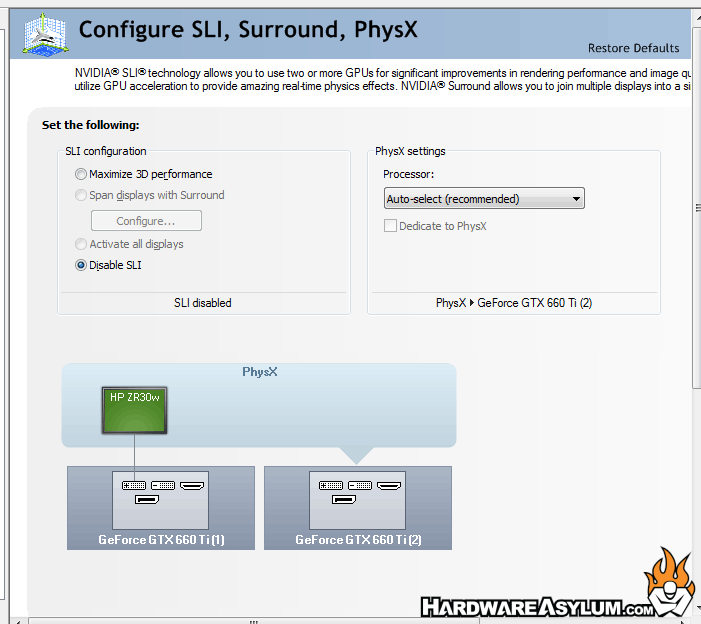
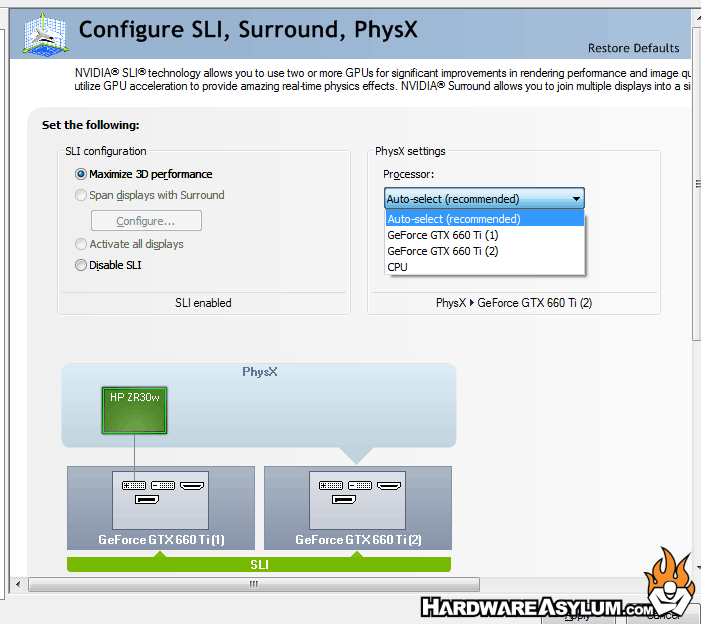
In the screen shot you will see three sections. The form in the upper left controls how the cards will be used. By default SLI is disabled and if you select Maximize 3D Performance then SLI will activate.
You also have the option to dedicate a single card to be your PhysX processor or delegate the calculations across all of the GPUs or just to the CPU. If you are planning on running benchmarks for HWBot you'll want to select CPU for PhysX processing as it is not allowed when running 3DMark Vantage.
SLI will activate on the fly and will remain enabled until you manually disable it or remove the secondary card.